The Lost Tutorial of Kafka 🎏 Pt. 3
📤 The Producer
My name is Luis Miranda and I am a full-stack Software Developer with recent experience building Microservices oriented applications. I attended Florida International University where I pursued a Bachelor's degree in Computer Science. Now I'm at PilotoMail building cool things
Here is a summary of Kafka. If you are already familiar with the topic, go ahead and skip this part. According to Apache Kafka: “Apache Kafka is an open-source distributed event streaming platform used by thousands of companies for high-performance data pipelines, streaming analytics, data integration, and mission-critical applications.”
For our assignment, Kafka will be used to stream real-time data by sending out events. This app will be focusing on the drivers. So, for each updated location of the driver, a producer will send out an event and a consumer will be listening to incoming records.
Configuration
First, we will be needing to configure a few aspects for this project: the application.yaml and Kafka programmatically. But let's make sure everything works fine with Kotlin.
Kotlin
For the generated Main Java file, remove it and create a ProducerApplication.kt file. IntelliJ should recognize that is a Kotlin file and work fine. After the above changes, make sure everything works with the command mvn clean install and by also running the Spring Boot app.
Resources
Now let's move to the resources file, I’ll be using YAML. Here we need to configure where Kafka will be running and specify the topic where it will be sending the events. Looking at the docker-compose file, we see:
Kafka will be running at localhost:9092
The topic name will be
driver_location
server:
  port: 9060

kafka:
  bootstrapAddress: localhost:9092
  topics:
    driver_location: driver_location

logging:
  level:
    root: info
Producer Configuration
Finally, let's work on the Kafka configuration. Will be creating two classes under a config folder. In KafkaConfig will set the server in which Kafka will be running, and the topic will be working on.
@Configuration
open class KafkaConfig(
    @Value("\\${kafka.bootstrapAddress}")
    private val server: String,
    @Value("\\${kafka.bootstrapAddress}")
    private val topic: String
) {

    @Bean
    open fun kafkaAdmin(): KafkaAdmin {
        val prop: MutableMap<String, Any?> = HashMap()
        prop[AdminClientConfig.BOOTSTRAP_SERVERS_CONFIG] = server
        return KafkaAdmin(prop)
    }

    @Bean
    open fun driverLocation(): NewTopic {
        return NewTopic(topic, 1, 1.toShort())
    }
}
constructor: define the Kafka
serverandtopicwith @Value.kafkaAdmin(): this will create a new bean of type KafkaAdmin with the specified
serverdriverLocation(): here will be creating the new topic.
Let’s move on to the producer configuration. Here will be specifying different properties for our producer like what type of events will be sending out.
@Configuration
class KafkaProducerConfig(
    @Value("\\${kafka.bootstrapAddress}")
    private val servers: String
) {
    @Bean
    fun producerFactory(): ProducerFactory<String, Any> {
        val props: MutableMap<String, Any> = HashMap()
        props[ProducerConfig.BOOTSTRAP_SERVERS_CONFIG] = servers
        props[ProducerConfig.KEY_SERIALIZER_CLASS_CONFIG] = StringSerializer::class.java
        props[ProducerConfig.VALUE_SERIALIZER_CLASS_CONFIG] = StringSerializer::class.java
        return DefaultKafkaProducerFactory(configProps)
    }

    @Bean
    fun kafkaTemplate(): KafkaTemplate<String, Any> {
        return KafkaTemplate(producerFactory())
    }
}
The most important part to understand here is how we are serializing events. I will go over serialization soon when talking about the model.
Key: for our case, the key will be the driver ID.
Value: The driver's longitude and latitude.
For the value, I’m using a string first to show an example. When we create the model, the value will change to that object.
Model
Here we will be creating the model which will represent a Driver. From the assignment instruction, we can see that the drivel will be a simple object containing three main attributes: the driver's ID and its location which will be presented with it’s latitude and longitude.
Driver
data class Driver(
    val driverID: String,
    val latitude: Double,
    val longitude: Double
)
Serializer
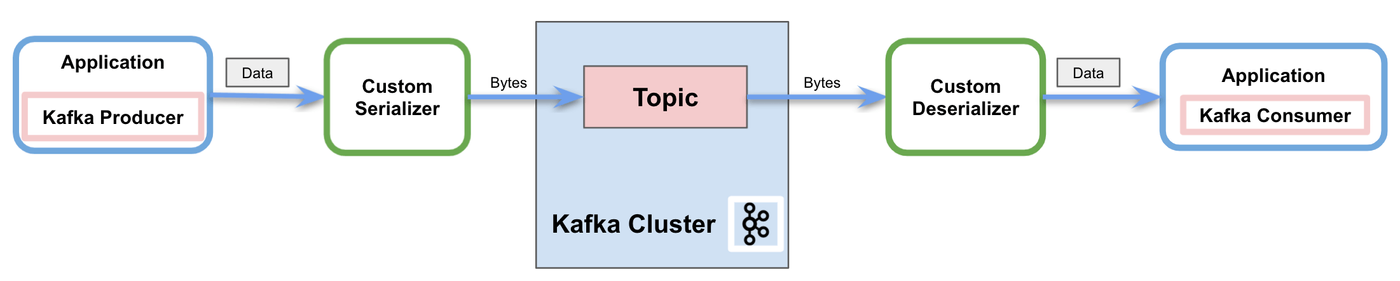
In Kafka, we need to serialize our data so it can be sent as a Byte to the topic. The image below illustrates how data is managed within Kafka.
In Spring we can use built-in serializers but what if we need to use one for our models? Fortunately, we can create a custom serializer!
import com.fasterxml.jackson.databind.ObjectMapper
import org.apache.kafka.common.errors.SerializationException
import org.apache.kafka.common.serialization.Serializer

class DriverSerializer: Serializer<Driver> {
    private val objectMapper = ObjectMapper()

    override fun serialize(topic: String?, data: Driver?): ByteArray? {
        return objectMapper.writeValueAsBytes(
            data ?: throw SerializationException("Error serializing Driver")
        )
    }

    override fun close() {}
}
Controller
Before showing how Kafka works, let's create a simple controller to trigger the app to send events to the topic.
import org.springframework.beans.factory.annotation.Autowired
import org.springframework.beans.factory.annotation.Value
import org.springframework.kafka.core.KafkaTemplate
import org.springframework.validation.annotation.Validated
import org.springframework.web.bind.annotation.PostMapping
import org.springframework.web.bind.annotation.RequestBody
import org.springframework.web.bind.annotation.RestController

@RestController
class ProducerController(
    @Value("\\${kafka.topics.driver_location}")
    private val topic: String,
    @Autowired
    private val kafkaTemplate: KafkaTemplate<String, Any>
) {

    @PostMapping
    fun publish(@Validated @RequestBody str: String){

        kafkaTemplate.send(topic, str)
    }
}
Example
Now let’s test the producer out. The way of doing this is by sending a request to the producer so it can send it to the topic. To check if that event went through successfully will use Kafka CLI tools through docker. There we can use a consumer to listen to a specified event (driver_location).
Let’s follow these steps to connect a consumer to our topic. Also, make sure docker is running and use docker-compose ps to see if the containers are up.
docker-compose exec kafka kafka-topics.sh --list --bootstrap-server kafkaContainer:29092docker-compose exec kafka kafka-console-consumer.sh --topic driver_location --from-beginning --bootstrap-server kafkaContainer:29092
{
    "driverID": "spam@email.net",
    "latidue": 23.29324,
    "longitude": -12.3243543
}
After following those commands your ready to see any events the producer sends to the topic and it should pop up in the console.


